Wednesday, June 24, 2020

Masks for All


It seems likely that masks are going to be part of our wardrobes for awhile. As soon as that became clear, I pulled out my faithful old Singer slant-needle machine & my stash of fabric and got started making these 3-layer cloth masks.
I've had requests for the pattern, so here it is in pictures with brief instructions - they're quite simple and I am sure that anyone who can sew will quickly master making their own. This pattern is for an average adult-sized mask - feel free to tweak the measurements to suit your needs. I will include notes at the end for the measurements for kid's masks.
Though I've known how to sew since I was quite young, I think like a leathercrafter when it comes to patterns and assembly. For example, you'll notice that I don't use pins - don't let that throw you. If you want to use pins as you go, please do!

My first masks were made with cotton pipe-cleaner-filled nose-bridge wires, which I've since replaced with aluminum strips bought online. Both work well, but if you're making a lot of masks, the precut strips with adhesive backs save quite a bit of time.


This collage shows my prep for these - both are encased in fabric which extends about 1/2" past the ends so it can be captured when you sew.

The aluminum strips get sandwiched inside a piece of bias tape. Quick and easy.
For the pipe-cleaners, fold two of them in half and nestle them together as shown. Then roll them inside a piece of your fabric, remembering to let the fabric extend past the wire ends on both sides.

In addition to the nose piece, you'll need a piece of cotton fabric measuring 12" x 9" and an inner layer measuring about 7.5" x 5.5". I've used a white interfacing material, but you can use any plain scraps you have around, such as sheet fabric.
I'm using 1/8" elastic cord - 1/4" is okay if you prefer ... you'll need two pieces per mask, each about 7" long.
Pins or two-sided tape, scissors, thread and you're ready to go!

Fold the larger piece of fabric in half, iron to create a crease, then refold with right sides together to form a 9" x 6" rectangle. Lay the smaller piece on this rectangle, roughly centering it.

Stitch a 3/8" seam along the bottom raw edge, catching the inner lining in the stitching.

Next, turn the end edges in about 1/2", overlapping the inner layer - press the edges in place.
Flip your project over to expose the unlined side, then center your nose piece snugly against the crease. Use a small piece of 2-sided tape (on the inside) or pins (on the outside) to hold this in place. Then turn the whole thing right-side-out and press flat.
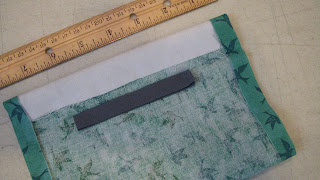


Now Stitch around the edge, as close as you can to the edge, making sure to tuck about 1/2" of elastic into the corners as you go, one piece per end for the ear loops.
Stitch around the nose piece as shown.


Form 2 pleats, about 1/2" deep, and press into place. Pin if you like.

Stitch a line across the top under the nose piece, then stitch down the side, securing the pleats, then across the bottom and up the other side, finishing the pleats.
Viola! You've made a mask!


Loop the elastics around your ears & expand the pleats to cover your chin & nose. Press the nose piece to form a comfortable fit.
These can be washed in warm water with your favorite detergent and dried on medium heat. Straighten the nose wire after laundering, as needed. Can be ironed on a cotton setting if desired, but take care not to overheat the elastic or the nose wire.
For masks to fit kids between ages 4-10, the instructions above will work, but your main piece will be about 8.5" x 7.5", inner piece about 4" x 6", with elastic pieces about 6".
Kid's masks need just one pleat, centered in the middle.
Permission granted to all to use this pattern freely - pass it on!
*These are not medical-grade masks*

Tuesday, June 23, 2020

Update, 2020

It's been awhile since I posted or even visited this blog... let's celebrate my return with a new, straightforward name. What was once "Leather is Better" is now simply AosLeather's Blog.
I have tidied it up a bit, removing quite a few outdated posts, including those featuring merchandise from my Etsy shop. (The shop is still there, linked on the sidebar, but I'm semi-retired, so the inventory is nominal.) The remaining posts will be tweaked and edited in the coming months (I hope) to compensate for some of the changes in the blogger platform that have altered the appearance from what the pages looked like when they were first posted. Until I get it figured out, the posts are going to look clumsy and the pics will seem oddly placed. Apologies for that.
And there will be the occasional new post, starting with the mask tutorial above this post.
It's June, 2020. We are dealing with a global pandemic, combined with international unrest over politics and racial injustice, all against the backdrop of climate change and massive wealth disparity.
I hope I can look back on this page in a few years and see that real, meaningful progress and changes have been made on all fronts!
Meanwhile, stay safe and take care.
We're all in this together.

Sunday, August 18, 2013

Building a Tooled Belt Design

I thought it might be fun to show you, start to finish, how a design for a tooled belt is built. 
It begins with the leather, of course. I use an exceptional grade of 8/9oz full-grain cowhide, cutting the straps by hand. I case my belts overnight - this is the process of getting the strap wet enough to tool but not so wet that it distorts with the impacts. Everyone has their own way of achieving this balance - I wet them thoroughly then put them in a plastic bag and into the refrigerator overnight. This lets the water distribute evenly to the inner grain and eliminates the need to re-wet while tooling.
Of course, you need a very hard surface to work on (I have my Big Block of granite) and a variety of tools from which to choose. I select each tool as i go on a new pattern - these are the eight tools I wound up choosing for this belt (tool numbers are notated on the progress pics).
 
I started by scoring the outer edges to create a border, then marked the design "centers" with faint dots. The spacing on this design is 1.5"


 The first tool (v400) is used twice at each mark, with the mark in the center, hit firmly with a 12oz mallet. 


Then the next tool (v406) is added in the space between the sets of the first tool. 


Next, one of my go-to faves (c366)  fills the small gaps, followed by a nice wavy "bridge" (v421) over the centers. 

Here I wanted to create an undulation to the flow with an inverted crescent  (v920) followed by smaller crescents (v744) in the opposite direction to frame the inverted ones. (whew! by now I've hit this belt hundreds of times!)
Then the design is bound together with seed-dots (s705) and, finally, embellished with small peaks (u851) under the bridges.


Edges were beveled and burnished, the belt was dyed a deep antiqued brown and finished with my own secret multi-layer process. 
I hope this glimpse into my processes inspires your creative urges!

Thursday, July 12, 2012

The Thrill of Going Global

As I'm sure I've mentioned before, one of my favorite things about reaching customers via the web is the international scope of my clientele. Every time I ship to a country for the first time, I place a pin on an imagined map; the map is getting new pins all the time, and I just love that! 
Never thought this would happen, though...
Recently my daughter and her dashing husband spent a week in Italy. One day, while waiting for a bus on the streets of Rome, they spotted a woman wearing one of my signature Floral Vine cuffs. This lovely lady, a fellow tourist from Canada, graciously allowed them to take this picture of her pointing at her cuff.
So, from Michigan to Canada and on to stylin' it on the streets of Rome at exactly the right moment to be spotted by my vacationing loved ones...
I feel a teeny bit giggly at the wonderful serendipity involved ;-)
This cuff, my most popular design to date, is available in my Etsy shop. Each is made individually, so every one is a unique piece, a bit different in flow and character from all of its international counterparts!

And thanks so much to this lovely Canadian adventurer, who didn't share her name. I appreciate your sense of style and that big smile!

Saturday, November 13, 2010

Revisiting an Old Friend

I moved this summer, as you may know. It was perhaps my most discombobulating move ever, probably due to the fact I had lived 12 years in my last house, longer than anyplace in my entire adulthood.
That is enough time to accumulate a lot of stuff and more than enough time to lose track of much of it!
So, as you might guess, one very cool part of the process was the opportunity to rediscover a few lost treasures.
There is one such find that I feel compelled to share here...

Berrien Thorn was a friend of mine. A wonderful man - artist, poet, activist and one of the best musicians I have ever known. He had a wonderful collection of folk instruments from throughout the world and could play them all! (My personal favorite was a banjo made of an old tobacco tin - as "folksy" as it gets, I think!)
Berrien had a rich personal history, including a fair stretch of time in his youth working with migrant farm workers. The people and lessons of that experience never left him.
From those years came this wonderful collection of musings, gifted to me some years ago with an admonition to share the words and support the cause. And so, in honor of a man and his vision, I share with you (in his own words, copyrighted in 1988**) ...


  1. I am a newspaper for the illiterate. I bring the whispered word. I sing them their own stories as they were told to me. Set to a tune the word goes round, and when they recognize a camp they nod and grin, elbow the others into the know: "Hey, that's the hole where I got beat up last year!"
  2. The men are worn and beat and want to kick back. They're slugging beers and playing poker for money. The atmosphere is a juke joint in Alabama. The music is a touch of home - easy as a handshake. The women gather at the other end of the cookhouse and sing "About My Jesus". The music is a church; voices rise in their simplicity against the darkness.
  3. The people here are always tired. Some old black man sits in the corner wiping the saliva from his white stubble with a stray hand. Three shirts on him, two ratty jackets and an overcoat, worn out boots sizes too big. Twenty years of cheap wine and potato dust can coat the eyes.
  4. Brutal work stooping to pull potatoes from the earth is the bottom of this odd context. Going upright into the trees for fruit is the top.
  5. The camp is a cluster of tiny shacks made of cinderblock and tin. One of them is the cook-house; this is where I sing. The cookhouse has a large room with picnic tables, an old juke box, bare bulbs burning, and a small wire-meshed window through which the overpriced food they purchase from the crew boss is passed.
  6. These little places are closed societies. When I was a kid the old man I picked with taught me everything, from the basics of negotiating pay, techniques of travel and work, to the songs he would play me on his banjo at night. Boredom was a preserver. Certainly the telling of stories was integral to surviving any evening's isolation without electricity. This is only the life of prisoners, migrants and family farmers. These are definitely on my list of endangered species, as am I.
  7. Some of these people come from Haiti. Crowded into tiny boats they floated toward the mysterious promise of America. They are possessed of pure primitive undertones. The non-Haitians are rural folk from Alabama and Georgia. A few of the men don't want their pictures taken; they are working these fields because this is one of the few jobs left where you don't need a social security number.
  8. When I improvise on my flute for the Haitians they look at each other and nod, saying the Creole words for 'bird spirit'. They know that the voice that was singing through the tube of the flute was not my person, but a spirit voice that sang through and empty self, my ego temporarily suspended, my shell possessed by a lesser god. They recognize that voice; in the form of improvisational music, such as jazz, which is a black idiom, this does not feel so far from the truth of a moment when the musician has reached a trancelike state and 'lets loose.'
  9. They are totally at the mercy of the environment, often miles from the nearest town, in hostile white redneck areas. You would think twice about quitting a job and walking away into this limbo.
  10. God is bread. Red patent leather shoes. A dental trailer that visits the camps is worth its weight in God.

Berrien left this world too soon, having passed just a half-century among us. He left a wonderful legacy of music, friendship and more: his will provided for a foundation that granted Art scholarships to migrant farmworkers that survived for years after his death.


**all art in this post and these field notes are the work and legacy of Berrien Fragos Thorn and are reprinted and shared here in his honor and to further his life's work.

Wednesday, March 24, 2010

Please, Take it Off!

A brief discussion of leather care is probably overdue.
This has been brought to my attention lately by several people expressing fondness for their leather wristbands or necklaces with words to the effect that they, "Never take it off!"
They sleep, eat, bathe and live with their favorite accessory 24/7.
Lovely sentiment, bad idea.
Wear it a lot. Wear it most of the time. But please, when you bathe, shower, swim or sauna, take it off!
Most soaps are drying to leather, as is chlorine or salt.
Heat bakes.
Repeated soaking, especially with warm or hot water, will remove many of the tanning chemicals that keep your leather from becoming brittle. This leads to a breakdown of the grain (which can destroy the appearance of a fine leather accessory) and hastens the weakening and death of that favorite item.
With a small amount of proper care, leather goods can and should last for many years.
Methods of care and cleaning are determined by the type of leather.
Smooth-grained vegetable-tanned cowhide is what most people think of when they think of belt leather. This is the type of leather that's used for tooled items; we'll cover that today and save suede and deerhide for another post.
Cleaning: This is not something you'll normally need to do with belts or wristbands - the patina that comes with age is generally considered desirable.
However, should you encounter a mud-bog or other serious dirt issue, or for smooth-grain footwear, a conditioning cleaner such as saddle soap or Lexol PH is strongly recommended. Apply as directed with a soft cloth and tepid water, rinsing thoroughly. A soft brush, such as a toothbrush, can be used for stubborn dirt. You should wash the entire surface - spot cleaning can lead to just that; spots!
Allow the item to dry completely in an airy location away from heat sources or direct sun.
Of course, there are some types of stains that will permanently mar your leather; no amount of cleaning will remove grease or ink, for example. Try to avoid staining your leather with those things!
Conditioning/Protecting: This should be done occasionally, particularly after cleaning or for items that get a lot of wear, such as an everyday belt or favorite wristband. My first rule for this is shoe polish is for shoes!! Do not use it on belts, wristbands, purses or wallets - you will not be pleased with the results! My second rule is leave the back alone! No conditioners or sealants should be applied to the backside of full-grain cowhide - leather needs to breathe!
There are many great leather conditioners on the market.
Some, such as Neatsfoot oil, are for oiled leathers only. If you use it on waxed leather you'll get blotching and clouding. Some, such as paste-type or beeswax finishes, are for waxed leather only. If used on oiled leather, the same nastiness will ensue.
Unsure if your item is oiled or waxed?
Happily, there are products out there that will work with either. Lexol conditioner is an oil-based product that will penetrate wax; Leather Balm is a wax-based product that will emulsify with oil. It should be noted that some conditioners may permanently darken light-colored leather, so it's a good idea to test a small hidden area when using any product for the first time.
Once the product has been selected, apply with a soft cloth according to the instructions. After allowing ample penetration time, wipe off any excess and buff with a soft shoe brush or lint-free cloth.
Do not buy into the myth that you need to place the item near a heat source to open the pores so the conditioner can soak in: I've heard this many times, and it is bunk! Remember, heat is bad for leather!
A good conditioner will offer a fair amount of protection against the elements. If you feel the need for a more waterproof finish, there are many excellent silicone spray treatments available anywhere that sells camping supplies. Check the label carefully to see if it is for full-grain or suede (some work for both) and use accordingly, with lots of ventilation!
If you clean your leather when necessary and condition it occasionally, I promise you can love wearing it most of the time for years to come!